SPOOKY DUDE STATIONERY

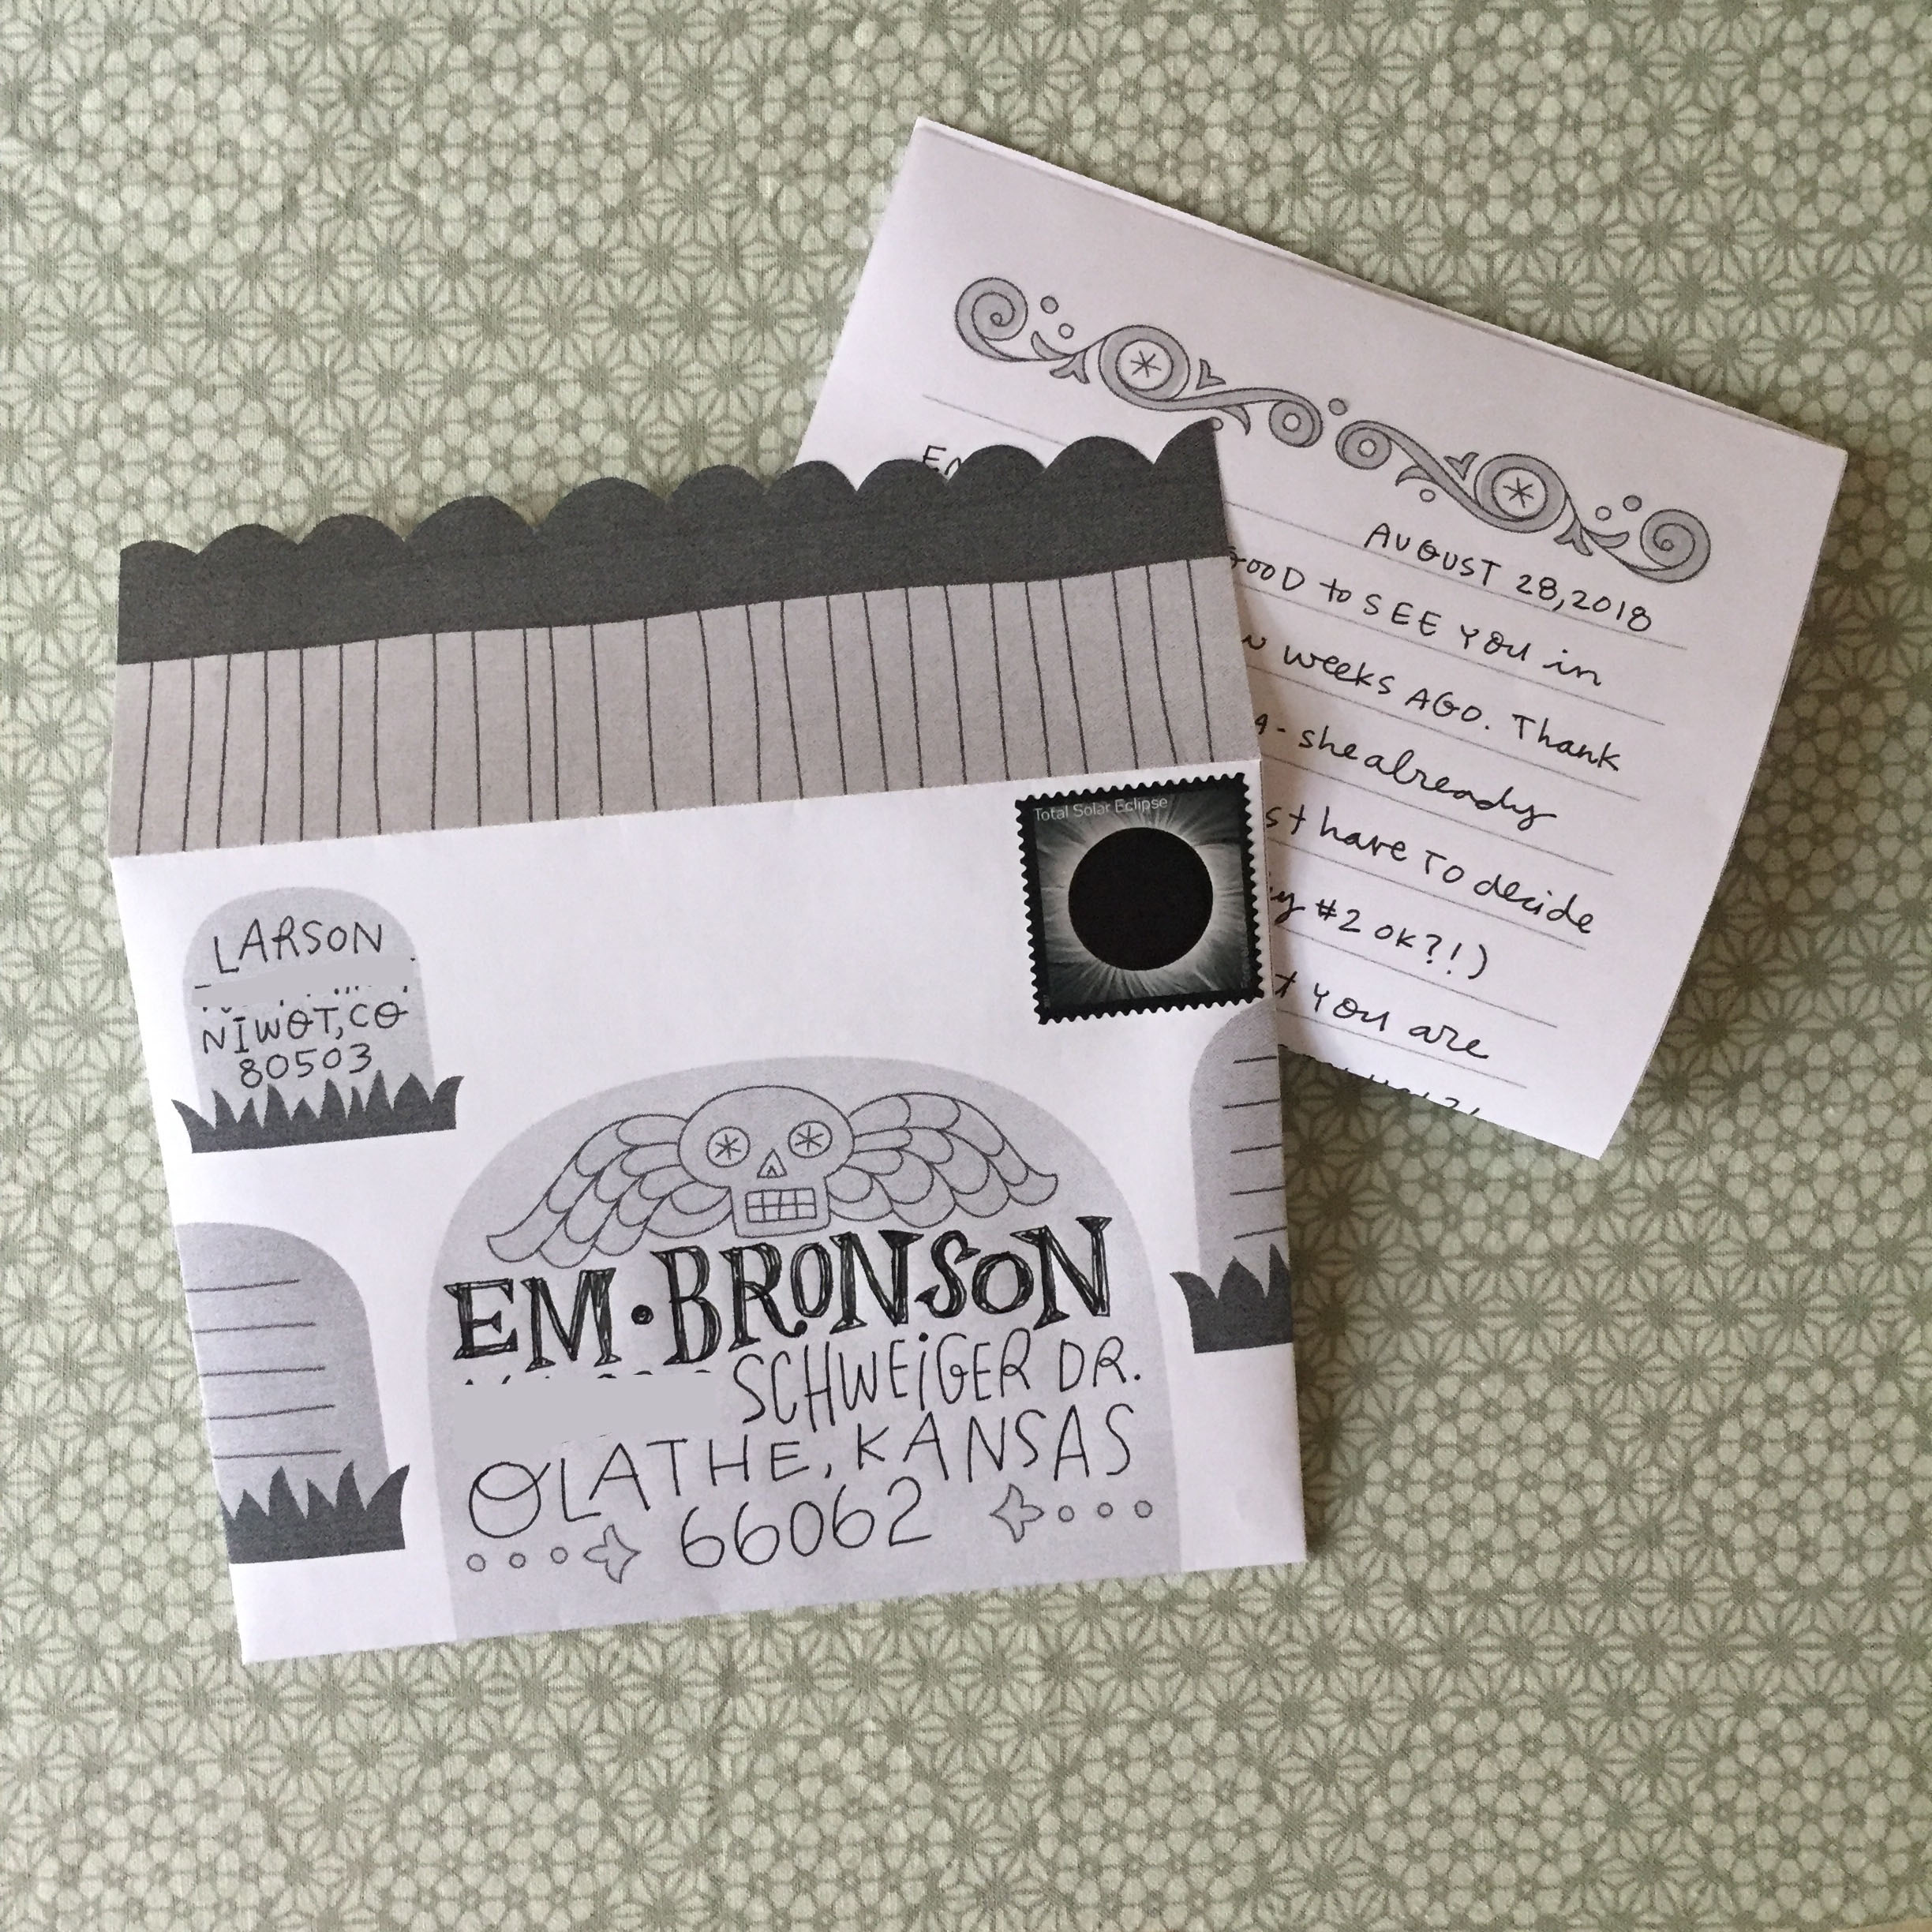
I mailed a few Spooky Dude necklaces and used this design to decorate the envelopes. I immediately decided it needed to be a stationery set - so now you get to enjoy it too! Click here to download the file, which comes with one envelope and two letter design options (two pieces fit on a page, and each piece when folded fits perfectly inside the envelope). I hope you use this to send some spooky mail to your friends and family!

IMG_8097 B.jpg
IMG_8106 B.jpg

Cut around the edge of the envelope, and fold on the other lines. You can cut the scallops of the envelope flap edge, or cut it straight across. I just used scissors - it doesn't need to be perfect! Use the glue spots on the side to know where to place your glue.

Spooky Dude Stationery 2018 for instagram.jpg

Download the file here and enjoy! Get the Spooky Dude plush pattern here!

Modern Quilts: Designs of the New Century

I am honored to have two quilts in the book Modern Quilts: Designs of the New Century. Riane Menardi, Alissa Haight Carlton and Heather Grant did a great job pulling together all the 200+ Quilts for the book. It’s a great visual representation of modern quilts and the Modern Quilt Guild.

mq book cover full.jpg

For my stop on the blog tour, I thought I would explain a bit about what the Modern Quilt Guild has meant to me in my quilting journey.

I have been quilting for 21 years – I made my first quilt when I was 13! I continued to make quilts off and on throughout high school and college. In my mid-20’s my friends started to have babies and I started making baby quilts. It was around this time that blogs were becoming more popular, and I had started seeing other quilters and the quilts they were making on the internet. I somehow learned about the modern quilt movement and discovered there was a guild right in my city.

In the fall of 2011 I joined the Kansas City Modern Quilt Guild. I tried to attend all the meetings I could, even though I didn’t know anyone (somewhat overwhelming for an introvert like me). I loved being surrounded by other people that also loved quilting. It was so inspiring to see the different quilts people made at Show & Tell and to hear from speakers that were doing new and unique things.

Over time, I started to become more involved in the guild, and even forced myself to share my own quilts in Show & Tell (even though it always makes my heart race)!

Being a part of the guild really pushed my quilting into a completely new place. I started making and designing more quilts and trying new things. I made quilts with solids only! I grew as a designer and as a quilter, and I know I would not have created all the things I’ve made the last 6 years had I not been a part of the Modern Quilt Guild. I learned so much from the members of my guild, and appreciate the ones that went out of their way to help me on my quilt endeavors.

If you are at all interested in quilts and modern quilts, I highly recommend checking out your local MQG (if you are lucky enough to have one close by). I recently moved to Colorado and joined the Boulder Modern Quilt Guild. It’s smaller than my previous guild, but all the women have been so nice, and I know I will learn a lot! Moving to a new place, I am grateful to have a community to meet new people, and who also happen to share my love of quilting.

quilts in mq book.jpg

You can read my previous posts about my two quilts that are in the book Welcome to Colorful Colorado and Whatever to learn about how and why I made these quilts. If you are interested in making Welcome to Colorful Colorado, you can purchase the Colorado quilt pattern from my Etsy or Craftsy stores.

Check out other contributors on their blogs, below:

Amber Corcoran  Heidi Parkes  Melissa Cory  Penny Gold  Shruti Dandekar  Amy Friend  Paige Alexander  Angela Bowman  Lysa Flower  Sheri Cifaldi-Morrill  Jacquie Gering  Christa Watson  Heather Black  Kristin Shields  Krista Hennebury  Cinzia Allocca  Suzanne Paquette  Yvonne Fuchs  Ben Darby  Nicole Daksiewicz  Kristi Schroeder  Kathy York  Marla Varner  Brigette Heitland  Stacey Sharman  Stacey O'Malley  Kim Soper  Steph Skardal  Cheryl Brickey  Shea Henderson  Katie Pedersen

Whatever Quilt

I’ve wanted to do a blog post for a while that explained some of how I made Whatever Quilt. I began and completed this quilt in 2016. I entered it into QuiltCon 2017, where it won first place in the Small Quilts category in Savannah, Georgia. I love this quilt so much, and it feels really great when other people love and appreciate it too (not that I need the validation, but it does feel really good)! Please let me know if you have any other questions about this quilt, and I will try to answer them!

WHATEVER full quilt KL white.jpg

I got the idea of Whatever quilt from something I designed in 2014. It was a lettered quote that I made to remind myself “you can do whatever you want”. It’s easy to get caught up in self-doubt and that makes it hard to make decisions. Knowing you are in control and are capable can help push through some of those negative thought patterns.

whatever quilt + sketch.png

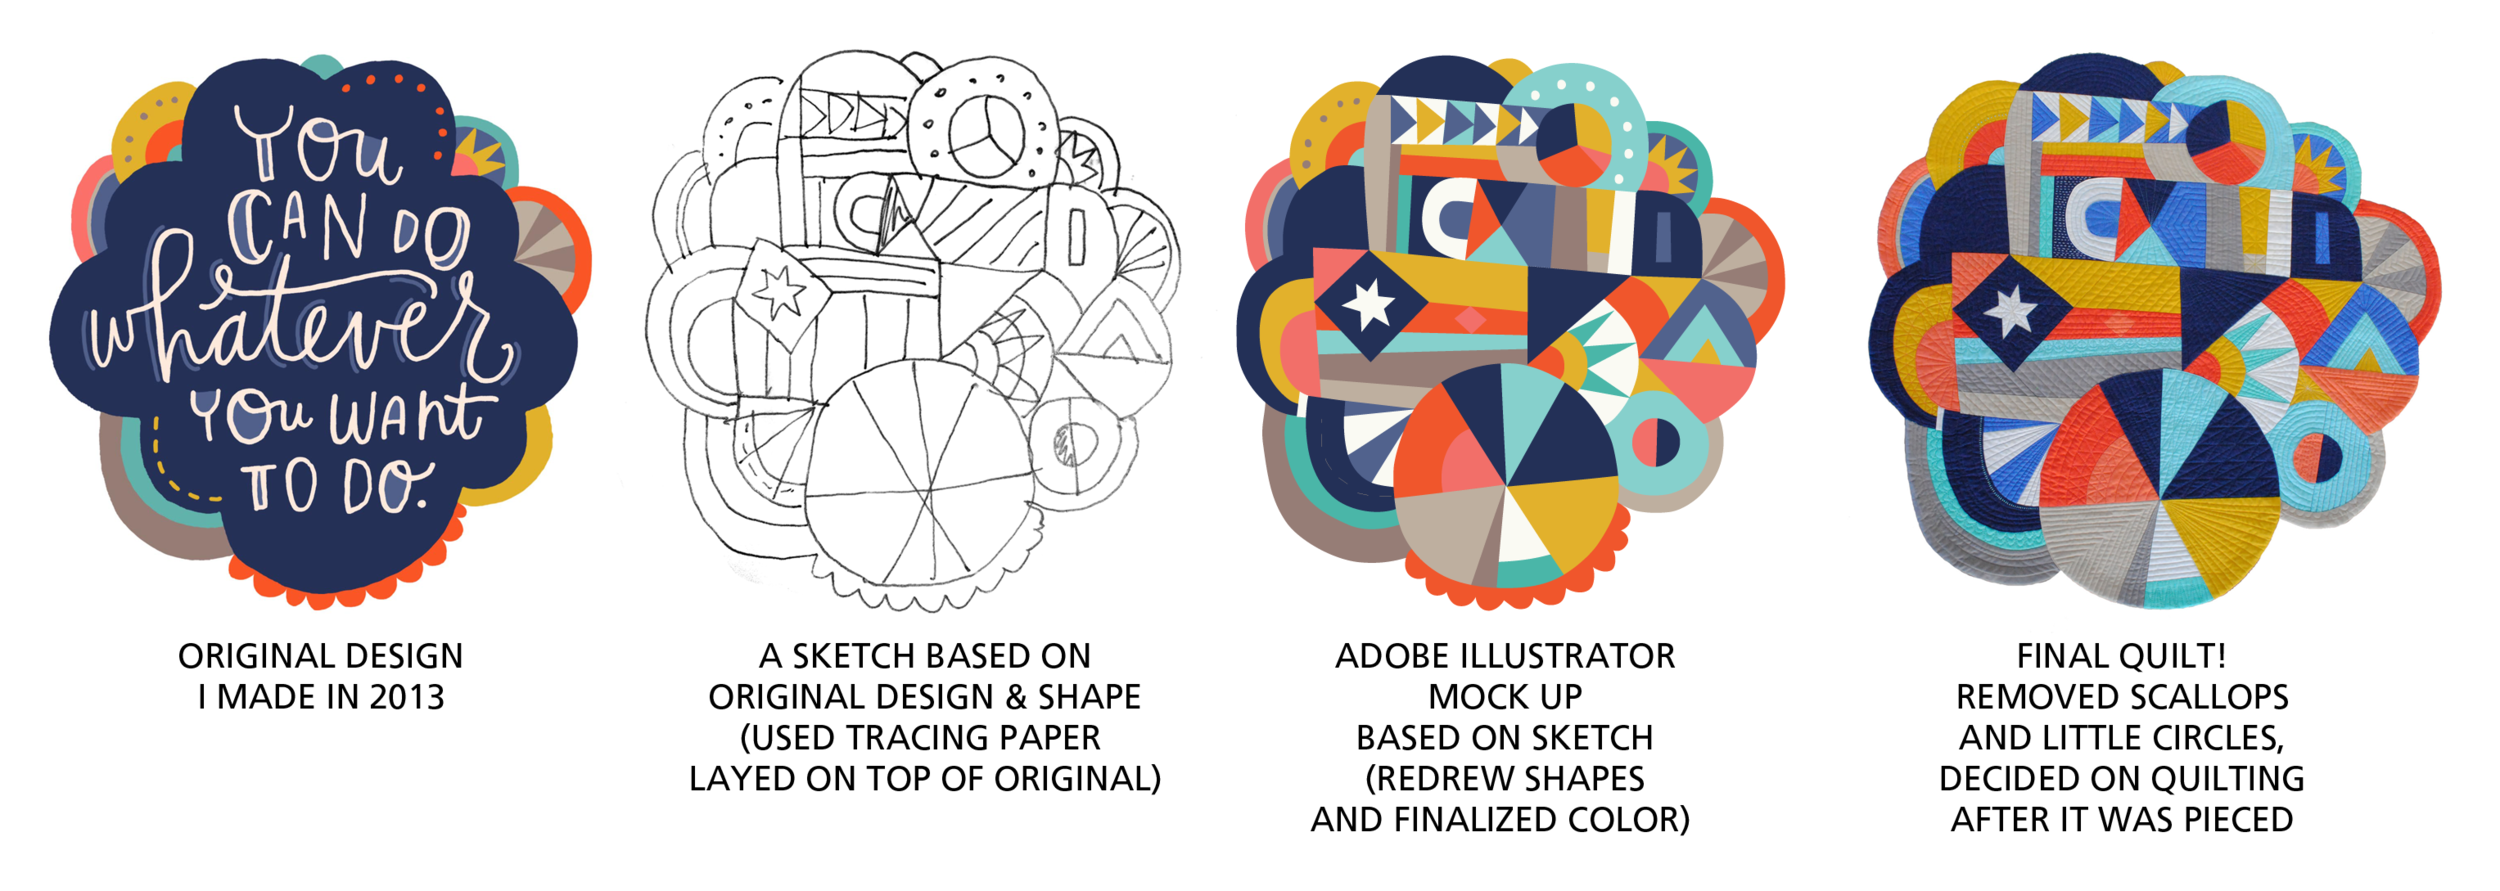
You can see from this series of images how the design changed, and didn’t change, through the process. I made a lot of the final decisions after I brought the sketch into Adobe Illustrator. Some decisions were based on overall design composition, and others were based on what I thought I could piece and construct well. For example, I had a hard time deciding on how to create the scallops on the bottom – how to sew them and make them look good, and how to attach them to the quilt. It was becoming too complicated for me, and I decided the overall design didn’t need them.

Using Illustrator was a great tool for me (I’m not sure I could have made Whatever without it). It let me easily play with the overall size and colors of each piece; and when it came time to actually make the quilt, made it easy to create templates with accurate seam allowances.

Whatever quilt was made with a variety of different techniques – nothing was off limits! There is a combination of piecing (with templates), paper piecing and applique. I didn’t really consider how it was all going to get sewn together until after the design was done. I didn’t want to limit myself, and I knew that I had enough experience to be able to eventually figure out how it could all go together.

whatever templates illustrator copy 2.png

I started by grouping things together into “blocks” and then figuring out where I needed seams and how each piece would actually join together. Then I created the templates and added the proper seam allowance and printed each piece to scale. None of this was improvised – everything was planned out very thoroughly before I began sewing (my brain just works better this way, and involves less stress for me in the end).

whatever fabric.jpg

I usually try to stick to one brand of fabric when working with solids, but the most important part is finding the right color. So, for this quilt I used a combination of Robert Kaufman - Kona, Michael Miller – Cotton Couture and Paintbrush Studio solids.

whatever close up 2.jpg

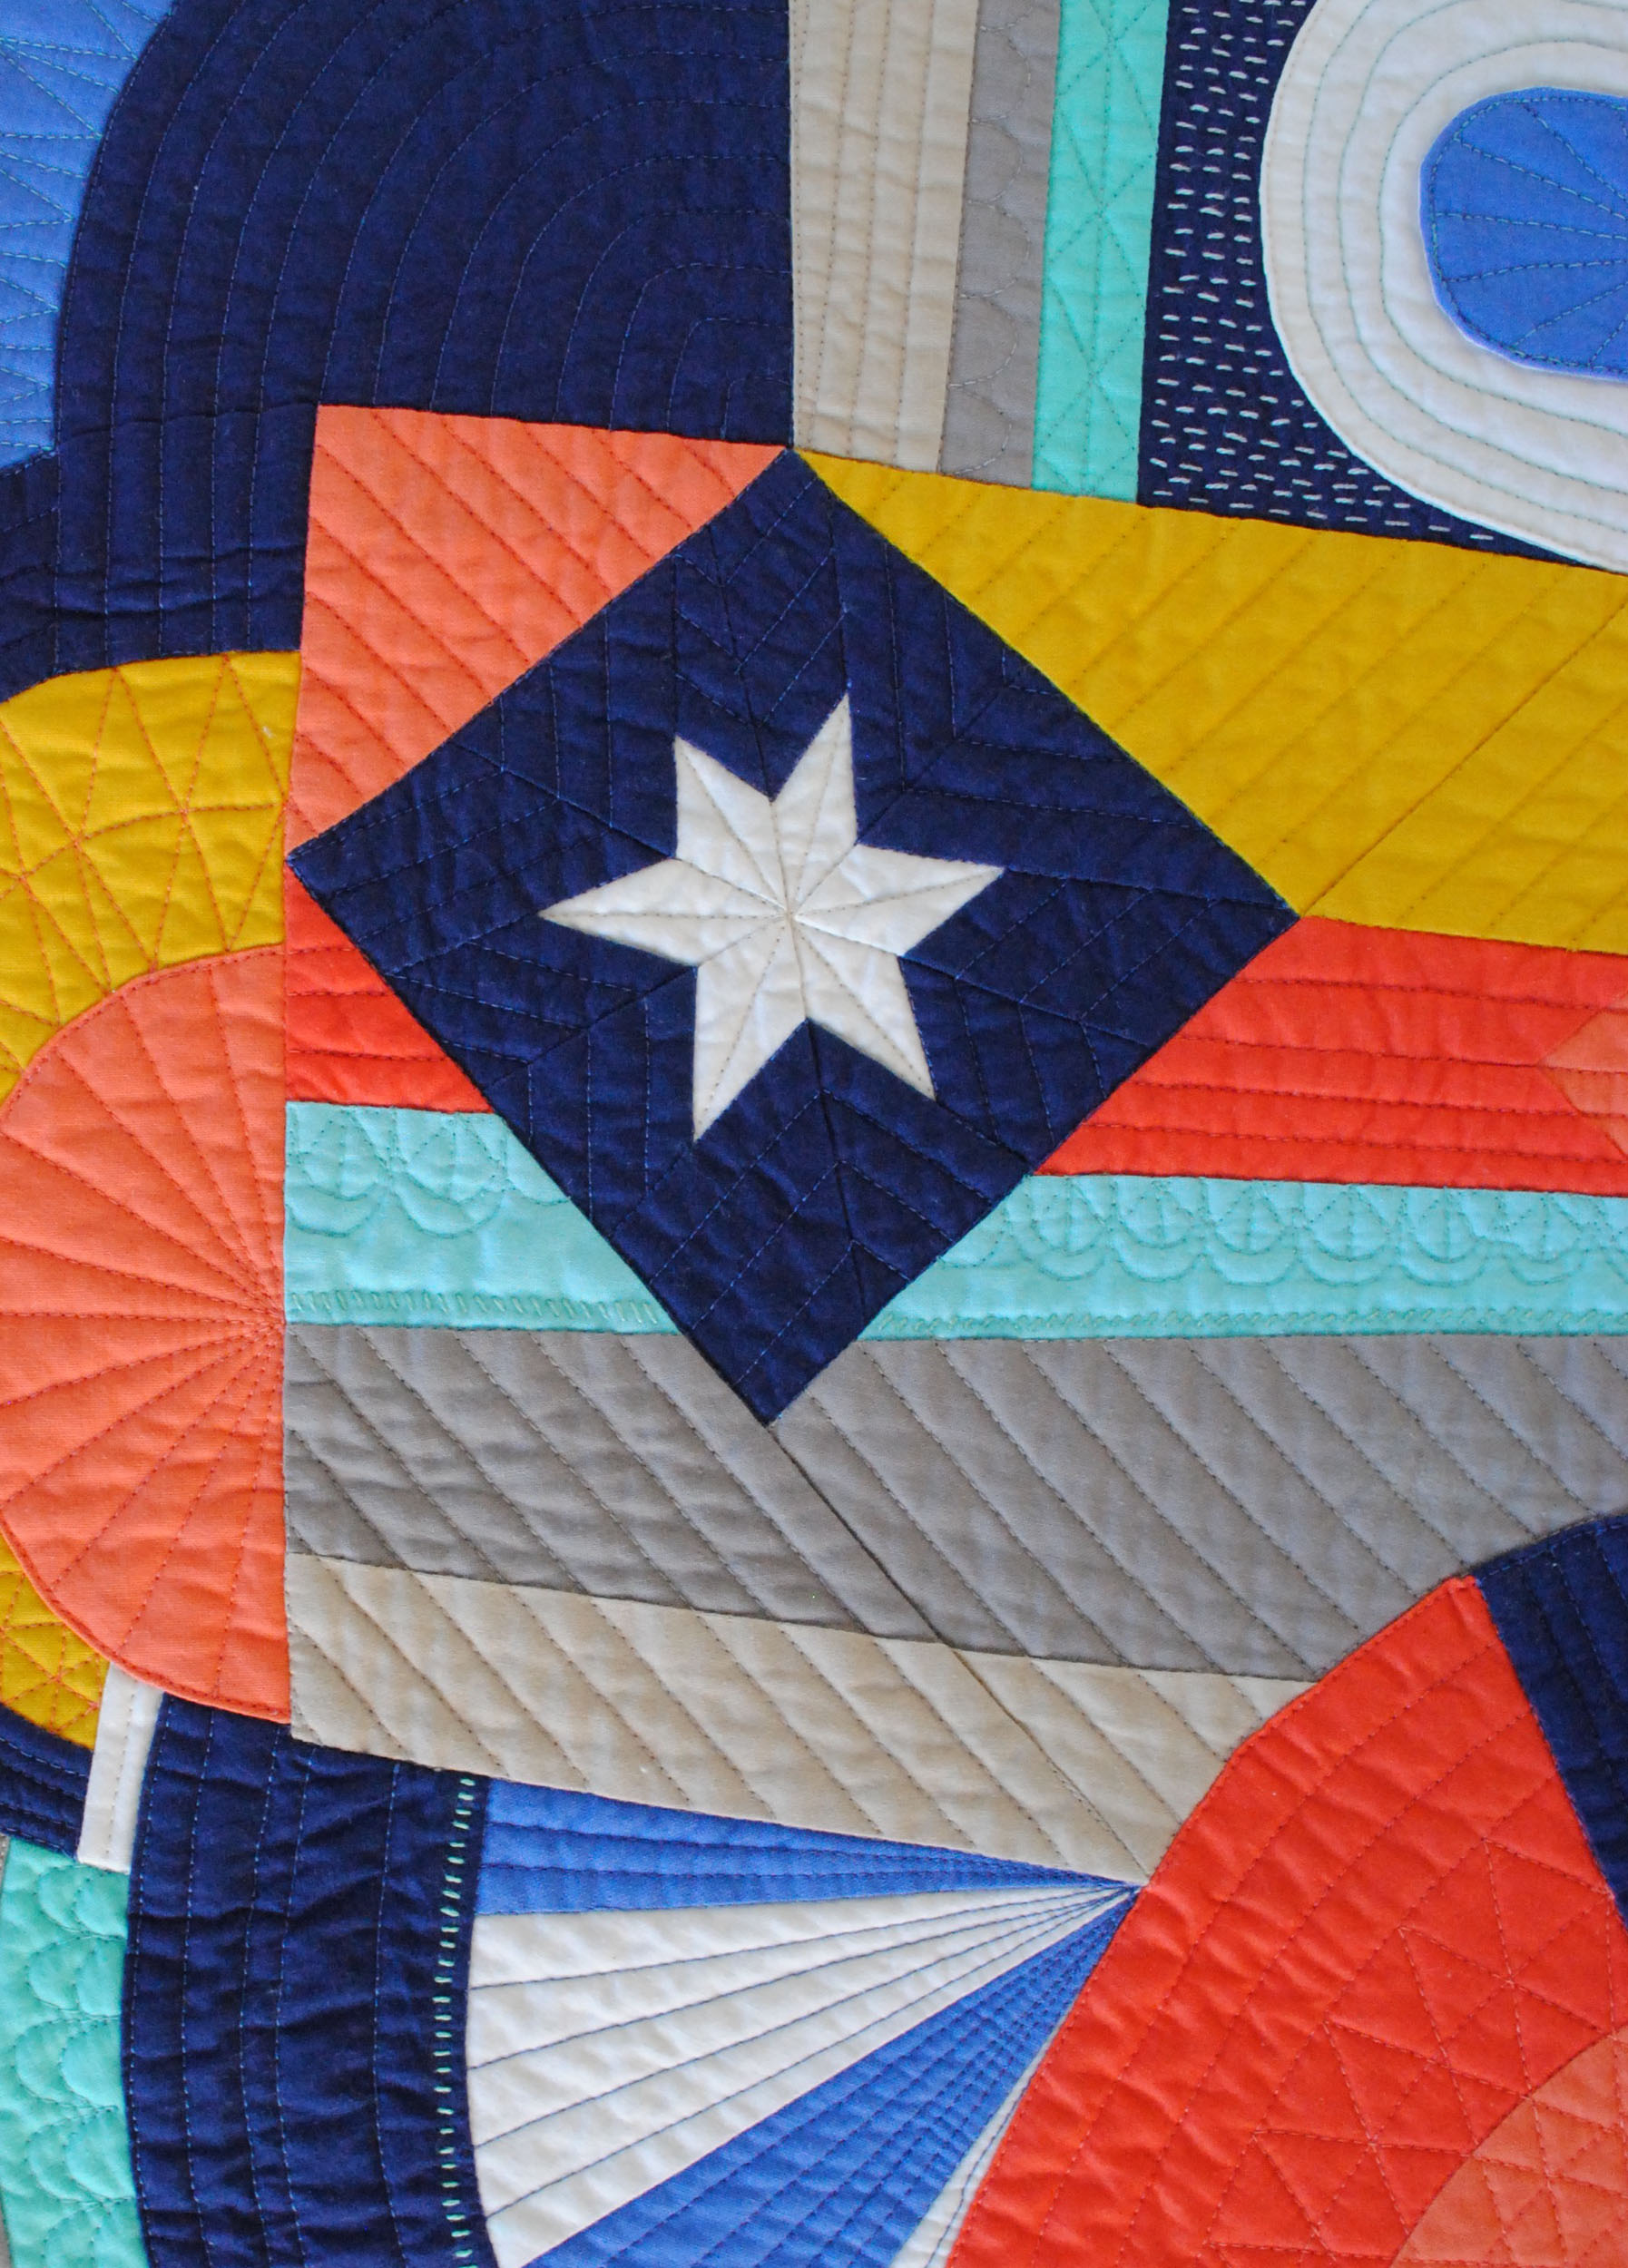
I knew while I was designing Whatever that I wanted a combination of machine quilting and hand quilting to add more dimension and texture. I didn’t decide on the final quilting designs until after it was all pieced together. I sometimes sketched ideas on paper, or used tracing paper on top of the quilt to play with different options.

WHATEVER detail KL.jpg

If you haven’t been able to see Whatever quilt in person, I hope these up-close photos will help show some of the detail of the piecing and quilting!

Fabric Wrapped Presents

Wrapping presents with fabric has become the preferred method for me and Jesse. We started a few years ago, and continue to use this method for each other because it works so well. If you are a sewist and/or quilter you probably always have a large stash of fabric on hand – so this method would be perfect for you! It is also fairly easy to do, and pretty close to the same amount of time and energy it takes to wrap with paper.

I will say, I only use the fabric wrapping for certain giving situations. Me and Jesse use this with each other, because it’s known that the fabric will go back in the stash. But if I’m wrapping a gift for anyone else, I will stick to paper. I feel like it’s not socially acceptable to ask for the fabric back:) If it’s a person that I know likes fabric, and the gift is small enough to use little fabric (fabric is expensive, and I usually don’t want to add that cost to what I’ve already spent) I will wrap with fabric, and the fabric wrapping becomes part of the gift. This year my in-laws will be spending Christmas at our house, so we are wrapping their gifts with fabric. I feel like since it’s in our home, it’s acceptable to collect the fabric after unwrapping and put it back in the stash.

I love this method for many reasons. I save money by not buying paper, and less paper makes it to the recycle or waste bin. Using fabric makes me feel less guilty about my large stash of fabric, and I’m able to get more use out of it too (there is some amazing fabric out there – and it looks great on a gift). Lastly, it’s a lot of fun! Because a fabric stash varies from year to year, and because gift sizes and shapes change, there is variety every time you wrap. Unwrapping fabric is just as much fun as unwrapping paper – and a lot more fun than opening a gift from a bag.

There are really just a few things you need for this: fabric in a variety of sizes (sometimes scraps will even work) and a collection of ribbons. I save the ribbons I receive from gifts or packaging. Cloth ribbon, yarn and other embellishments can be pretty cheap if you need to purchase a bit to build up your ribbon collection.

TIPS

-Start by pulling out a variety of fabrics. You may have a specific color scheme in mind depending on the holiday or gift recipient.

-If you have larger gifts or a piece that is slightly too big or small, safety pins and double sided tape can help to make your wrapping more secure. I only have to use that less than 10% of the time though.

-I never cut down fabric or ribbon. I make it work with what I have by folding in the extra fabric, or find another piece that works better.

I generally wrap with fabric the same as I do with paper – meeting the sides in the middle, and than folding the ends in. I use the ribbon to secure the ends so I don’t have to use tape or safety pins. If I have enough fabric, I like to tie the ends together. This technique is like the Japanese wrapping cloth called

Furoshiki

. You can find lots of tutorials on the internet if you are interested in that. You can also leave the ends loose, and tie them off with ribbon (place the gift in the middle of the fabric, pull up the fabric around the gift, and tie it closed with a ribbon at the top). Fabric is really versatile, so you can adjust your technique based on the shape and size of the gift.

CEREAL BOX TAGS

To make the tags, I cut shapes out of cereal boxes. I love using cereal boxes for lots of different things, because we already have them around the house, and I really like the look of the kraft paper backing. Sometimes I draw the shape out with pencil and than cut them out with an x-acto, but a lot of the time I just wing it. Write the name on with a black pen and attach to gift. Sometimes you can tuck it under the ribbon, and it stays in place, other times you make have to make a slit or hole to run the ribbon through the tag. On a couple of the gifts I added some branches from our Christmas tree (a Balsam Fir this year).

Me and Jesse wrap in our own ways, but neither of us tries to wrap perfectly. Raw edges show, sections may be more bulky than others, and the fabric may be a little wrinkly. I feel like you can get away with a little more because it has that handmade feel when you are done. Most importantly, it should be fun, so let yourself play around and see what different things you can come up with!

You can do whatever you want to do.

I have to remind myself of this on a daily basis. It’s easy to get caught up in what you think you should do, or what others are doing or telling you, but it’s always best to just trust yourself.

This phrase became one of my mottos to live by in college. I was taking a ceramics class at the time (I was a graphic design major, but there were a certain number of studio art classes that were required) and I was struggling. I waste a lot of time in self-doubt and being indecisive and I’m really good at overcomplicating things.

Luckily, I had a friend in ceramics class with me. Usually my self-doubt would get in the way, and I would ask her for advice or confirmation of my ideas. I would ask something along the lines of “Margo, what should I do?” (in probably a very frazzled manner) and on this particular day she responded, “Katie, you can do whatever you want to do.” (in a very calm and patient manner).

It was very simple advice, but somehow it really hit me. Whenever I get into those spirals of not trusting myself, those words really help bring everything into perspective. Somehow everything becomes clearer, and deciding what decision to make or what my next step should be becomes easier.

In case you need to hear this same advice every now and then, here are some prints for you! There are four to choose from – you can choose whatever print you would like! A simple black & white, a crazy black & white that would make a fun coloring page, and two other color options. See, I’m not very good at making decisions (I couldn’t choose just one) but this is my blog and I can do whatever I want:)


Download the black & white versions, or color versions. Note, these will print on an 8.5” x 11x sheet of paper, with each design measuring 5” x 5”. If you would like a smaller 4” x 4” version, print out the file at 80%.

Optical Illusions Blog Tour & Book Giveaway

Hello! It’s my day on the Optical Illusions Blog Tour! I’ve never participated in a blog tour before, so hopefully this goes well:)

It took a bit of time for me to come up with a design for this book. I happened to find some good research/inspiration from a project I had done in design school (I’ve kept almost all of my college work because it was so time consuming I can’t part with it, and I’m a hoarder). I found lots of patterns and studies on color and form that provided much needed inspiration (I found good research on Google too). 


A lot of optical illusions work because of high contrasts in color, but I knew I wanted to include an accent of color as well, and that helped guide the design a bit. I also like the play with foreground and background, and how fluctuations in shape can create new forms or illusions. One of my favorite parts is how the quilt creates curved lines, even though all the forms are made of angles. 

I kept it really simple and only did stitch-in-the-ditch quilting on this. I was totally stumped on what quilting to do, because I didn't want anything that would detract from the overall design and pattern. Luckily, this book also comes with quilting ideas for optical illusions, so I may go back and add more quilting to it later! You can also read my other post about my quilt Curvilinear here.


As part of the blog tour, I am giving away a FREE Optical Illusions book! Just leave a comment below to enter the contest. A winner will be selected in one week, on Wednesday, November 19th. Also, check out the other blog tour participants and Optical Illusion designers below!

Congratulations to Lisa E. on winning the Optical Illusions book! Thanks to all those who visited the blog and left a comment. I loved hearing from all of you!

Nov. 3
My Stars – Kick Off www.mystarsblog.com (book)
Deb Rowden www.debrowden.blogspot.com (BB FQ bundle)

Nov. 4
Angela Walters www.quiltingismytherapy.com (Athena bundle)

Nov. 5
Penny Layman www.sewtakeahike.typepad.com (book)

Nov. 6
Melissa Corry www.happyquiltingmelissa.com (Oakshott FQ Bundle)
Lily’s Quilts www.lilysquilts.blogspot.com (3 - 5" Oakshott charm pack)
Fat Quarter Shop www.fatquartershop.blogspot.com (Naptime Bella FQ bundle)

Nov. 7
My Stars on behalf of Mary Kay Fosnacht/Karen Hansen www.mystarsblog.com (book AND Kona color card)

Nov. 10
My Stars www.mystarsblog.com (book)
Jamie David www.patchworkarchitect.blogspot.com (3 packs of charm squares from RK)

Nov. 11
Elizabeth Timmons www.andpins.wordpress.com (3 packs of skinny rolls from Robert Kaufman)
Tammie Schaffer www.craftytammie.com (book)

Nov. 12

Nov. 13
Jenifer Dick www.42quilts.com (book)
Trisch Price www.hadleystreetquilts.com (Kona color card)

Nov. 14
Jacquie Gering www.tallgrassprairiestudio.blogspot.com (Kona color card)
Shea Henderson www.emptybobbinsewing.com  (A large and small Kaleido-Ruler set by Marti Michell) 

Movie Foodie: Beetlejuice

Beetlejuice was a really fun Movie Foodie to plan. I will say, there weren’t many foodie references in this movie, but I was so excited to plan the party aspect of the event. Me and Jesse had dressed up as the Maitlands several years ago, so I already had some props I could use for the party, like the “Handbook for the Recently Deceased” book.    


The menu: Shrimp cocktail – the only food item taken directly from the movie, the famous Day-O dinner party scene; Shoo-fly Pie – there’s a scene where Beetlejuice eats a fly, so this represented that; Minute Maid orange juice – where Beetlejuice is trying to get Lydia Deetz to say his name; “eyeballs” – the Maitlands seemed to use eyeballs a lot when doing their “scare faces”, eyeballs popping out, and putting eyeballs on fingers; and Sandworm breadsticks – representing the sandworm that likes to eat dead people.

One of my favorite things about Movie Foodie is trying new things, and Shoo-fly Pie is now one of my favorites! I have decided it should be the official Thanksgiving or Holiday pie, due to its ingredients of molasses, cinnamon, nutmeg, ginger and cloves. It was sooo good (and awesome with vanilla ice cream too) and not too sweet or rich, which I really appreciated! You can find the recipe here.


I also made a mini version of one of Delia Deetz’s sculptures. I will do another post where I explain how I made this, and the Sandworm breadsticks – in case there is someone else out there who is also interested. I’m thinking there will be, as I saw lots of inspiration out there, including a Beetlejuice themed wedding! I also saw lots of ladies dressing up as sexy Beetlejuices, which I just don’t understand.    


As an added bonus, I had Jesse agree to dress up as Beetlejuice - he was a really good sport about it:) He already had the costume from two previous Halloween parties, one when we went as the Maitlands, and the other as Beetlejuice (there’s a scene where Beetlejuice appears in the same outfit as Adam Maitland). It was a really fun surprise for most people, and I had my camera set up so everyone could take their photo with him - they seemed to have lots of fun with it!

DIY Zoobilee Zoo Whazzat Kangaroo Costume

I have been meaning to write a more detailed post on how I constructed Whazzat’s costume from Zoobilee Zoo. Hopefully this may help you a bit if you decide to make this costume! I will say, it probably cost around $100 after I purchased everything - probably more. It was a lot of work putting it all together, but it was such a fun costume to wear – and hopefully I’ll have more chances to wear it in the future!


WHAZZAT KANGAROO BODY
I used a pattern to make the basic kangaroo outfit. It is a McCall's Costume Pattern (It says "Easy" on it, and it wasn't too hard to put together), pattern #M6106. I got the adult size Large (for size reference, I usually wear a US size 12/Large in most clothing, and am 5'10"), and I will say this was WAY too big! Thankfully, I started with a muslin, and adjusted that before cutting into the fleece (took in several inches everywhere, and added length in the arms, torso and legs). I should have gone with a Medium, at the most. I think the pattern is going for a looser look, so that may be part of the reason it was so big. Whazzat's outfit is definitely more form fitting.


Tip: After stuffing the large kangaroo tail, it became quite heavy. When I first tried on the costume, the tail was really pulling down the rest of the body, and also creating a weird look on the back. To avoid this, I pinned a long piece of sturdy, thick ribbon onto the inside of the body, where the top of the tail joins the back. I tied this around my body, and that helped counter the weight of the large tail. See photo below:


If you want an easier option, I also looked into getting adult full body pajamas. Here are a few options: Pajama CompanyMy Party Shirt. I decided not to go with this because of cost, and I still would have had to add a pouch, ears and tail. It would have a saved a bit of time, and if you aren't comfortable with sewing, this would be an easier option.


BIB VEST
I used a very basic vest pattern (an old one my mom had) and altered the front piece by curving the corner. I’m included a basic template (you’ll have to enlarge the vest front and back pieces when printing) of the vest, which also includes templates and layouts for the tail bow and music notes. I also had to make the ruffles for the vest - and I don't know how to do ruffles! They turned out ok, but the ruffles actually took the longest (probably because I didn't know what I was doing!). So, I'm not really much help there. I used Velcro to close the vest – this made it pretty easy to get it off and on. See photo below:


MATERIALS
I purchased most of the material at JoAnn Fabrics. One, they have a wide variety of different materials, and two they have lots of sales! I used many 40% off coupons to help cut costs. I know most people have a love/hate relationship with this store, but for a Halloween costume, I can’t justify spending a lot of money on high quality fabric and materials.

Purchases from JoAnn's: light pink fleece for the main body; ½” wide pink satin ribbon for the ballet shoe "laces" (I think I purchased 2 spools); teal (at least 3 yards, maybe more), yellow (at least a yard) and pink fabric (1/4 yard) for the vest, hair bow and tail bow (I tried to get the best color match, and then went for the cheapest option); fake lace trim for detailing on the vest (I think at least 2 spools); fill/stuffing for the tail; ¾” Velcro for the vest, zipper for the main body; and the McCall's pattern.

The pink tights were purchased on Amazon. The wig was purchased from Ebay, but you could also check Amazon. Pink gloves were purchased in store at Walmart or Target. And the ballet shoes I already had from taking dance in school. I used a light pink face make-up (like from those cheap Halloween kits you find at a big-box store) to finish the look!

This is a rough, quick tutorial, but I hope it helps a bit! It’s nice to know there are so many other Zoobilee Zoo fans out there:)

Colorado Quilt Pattern & AQS Show!!

After almost a year, I have finally completed a pattern for Welcome to Colorful Colorado! There was a huge learning curve for me in making this pattern, and I made some mistakes along the way, but now it is complete!


I have chosen to start simple, and am selling this pattern on Craftsy. This is nice for a couple reasons; one, they are a great company that provides a great place to sell patterns; and two, they are based out of Denver, Colorado! It only seemed fitting that I would sell this pattern through a Colorado based company. I may also eventually sell it on Etsy, but I want to start small, and this seemed the best way to do it:) If you are interested in making Colorado quilt for yourself, check out the pattern here!


Welcome to Colorful Colorado was named Honorable Mention in the Modern Wall Quilt category at the Des Moines AQS quilt show at the beginning of October! This was my first time in a juried quilt show, so I was very excited that Colorado quilt was chosen to participate. It was also my first time visiting a large quilt show. I was able to go with my mom (who has been to MANY quilt shows before) and we had a lot of fun walking around the show, looking at quilts, and checking out vendor booths. I forgot to take photos at the show, but here's one of Colorado quilt and it's ribbon!

Optical Illusions Quilt Book!!


I am very excited to announced that I am published in a book! About a year ago I had the opportunity to submit a quilt design for an optical illusions book Kansas City Star Quilts was putting together (thanks Shea for letting me know about this project!). This was the first time I had created a quilt design for a specific project, and it was hard! It took me awhile to figure out what my design should be, but in the end, I am happy with the results. And KCSQ was so easy to work with, which was helpful for a newbie like me.

There are many other awesome quilts in this book too, some of which I'm hoping to get a chance to try out (I'll have to add it to my long list of quilt to-do projects). And, 7 of the 9 designers featured are also part of the Kansas City Modern Quilt Guild! I think that's pretty awesome, and it makes me very proud to be a member of our guild:)


Above is the design as I submitted it. You can see that the block is very versatile, so you can play around with the direction of your blocks, and you'll get different effects. It works great in different sizes too. The 80" x 80" (16 blocks) is a great large lap quilt, and the 40" x 40" (4 blocks) works great as a baby or wall quilt. You can see the smaller quilt in the photo below.


If you make this quilt, I would love to see it! When I showed my mom the design, she was not excited about all the pieces, but I hope you aren't dissuaded by that! If you like triangles and matching points like I do, than you will love this quilt. It has a lot of impact when it's all sewn together, so it will be worth it! You can get your copy of the book here.

Octagon Baby Quilt


My friend just had her second child, a boy! Designing quilts for a second baby is kind of difficult. Do you do something different, but what if one looks or seems more superior? I was a second child (ended up being a middle child) so I have very strong feelings about further children not getting screwed (my sister always seemed to get the better versions of everything).


So I decided the best thing was to do something similar, but different (you can see her daughter’s quilt here). I got the color palette from my friend and decided on an octagon for the shape. I used the same quilting as before, and used flannel on the back. I can’t wait to see her baby boy on his new quilt!

Trash Can Labels!

Lots of exciting things have been happening around here – like organizing the trashcans in our kitchen! So, so exciting…


But really, this is a huge upgrade from the situation we’ve had for several years. We had a container for trash in one part of the kitchen, a different container for recycling in another part of the kitchen, and the glass would just pile up on the floor in the corner. Nothing was labeled, so when guests where over, there were either questions about where to get rid of things, or trash would inevitably end up in the recycling. It wasn’t working. 

We bought two more trashcans to match our other one (they are super functional, and not cute, but they are pretty simple and narrow, which work well for our situation right now), and put them all in the same spot of the kitchen.


I made the labels to easily distinguish where things go, and so far it seems to be working great! Much more organized than the mess we had before. 

I’ve included the file here, if you are also in the same situation we were in. I made mine with a vinyl cutter, and had it cut around the lettering. This made it a little difficult to adhere since they came out more delicate than I planned. The version in circles should hold up a lot better, and be much easier to cut and apply! I would definitely recommend using vinyl (if you have a Silhouette or Cricut at home) or printing the file, and than laminating the paper – should allow for easy cleaning and they should last a little longer.

Bridal Shower Paper Blooms

I finally got a chance to use the amazing book Paper to Petal. It's one of the best book purchases I've made, even if you just look at the beautiful paper flower photography. These flowers were made for my friend's outdoor bridal shower while watching many, many episodes of the show Dexter on Netflix (I got hooked, but vow to stop after season 4!)


Napkins were from Oh Joy's Spring Target line. Paper plates are from Shop Sweet Lulu. There's a variety of tissue paper issued, but the mint green/coral/pink is from Paper Source.


Savannah, Georgia: Mini Guide

Savannah has become one of my favorite places to visit. It has a little bit of everything, from the old historical charm of the South to the beach on Tybee Island. It’s equal parts relaxation and adventure, and small enough that it’s easy to get around and not too crowded. 

I’ve been lucky enough to visit with my good friend Em as a tour guide, and will be going back again in a few weeks to celebrate her bachelorette party. Em went to school at Savannah College of Art & Design (SCAD), so she spent 4 years getting to know the area really well! 


Top 6+ Favorite Savannah/Tybee Things:

BROUGHTON STREET
Several blocks long, this street is full of shopping and food. Some of my favorites are:

-You can taste all the different flavors of their honey!

-One of the best shops ever, it has an eclectic mix of new and old items.

-The best ice cream in Savannah. The line can get pretty long, but if you go during off hours you can avoid longer waits.


SCAD
This art school has played a big part in the revitalization of the city. They have fixed up lots of old buildings as part of their campus.
-ShopSCAD carries a wide variety of items made by SCAD alumni and students. 

-Kind of a dive, but it’s so good (well, I always get the same thing and it’s delicious, The Elvis: peanut butter and banana french toast). It was also in the book/movie Midnight in the Garden of Good and Evil.

We stayed on Tybee the first couple of years we visited. Last year I stayed at Planter’s Inn. It’s in a great location, and was affordably priced the weekend we were there. Next door is The Old Pink House, a nice restaurant, though a little pricey. Each room has a different ambiance to it. They also have an outdoor patio upstairs that’s nice at night. The lowest level has a little bar lit mostly with lanterns/candles, with live music and special cocktails – it’s really neat! You’ll want to make reservations, especially if there’s a specific area you want to dine/drink.


-The largest park in the city full of large oak trees with Spanish moss. We always bring a blanket and take a nap in the park:)

TYBEE ISLAND
A short drive from Savannah, Tybee has a small town feel, and is a great place to visit the ocean.

North & South Beach
-North beach is generally less busy, and just as nice. The lighthouse is also on north beach. South beach has all the little shops and a nice beach as well. There are jellyfish in the water, and usually some dead ones on the beach – just something to look out for.


-It’s fun to climb the lighthouse, and get a 360 degree view at the top. You can see the ocean and marshes from up high, which is nice. The also have a museum in the house the lighthouse keeper’s family lived in, has lots of neat old stuff and some nice quilts.


Some other fun things: Cute fabric boutique shops: Fabrika & Measure; Juliette Gordon Low House (founder of the Girl Scouts); ride a Vespa.


Want a little taste of Savannah/Tybee, but can’t get there soon enough? Watch these films: Midnight in the Garden of Good and Evil, Forrest Gump, The Last Song.

Urban Gardening: DIY Sub-Irrigation Planter

Last year we tried a DIY Sub Irrigation Planter (SIP) for the first time. A SIP is a planter system where water is introduced from the bottom of the planter. This allows plants to have a constant source of water, and also saves you, the gardener, from having to water as often. We have an upper deck that gets pretty good light and were interested in a having a few container plants. We had tried cherry tomatoes in the past, but had issues with them splitting in the heat. Especially in the middle of the summer, we’d water the plant in the morning, and by the time we got home from work the soil was completely dried out. This also made it hard to leave for more than a few days, and we didn’t want to be reliant on friends coming by to water for us.

We got a book from Jesse’s brother called Fresh Food From Small Spaces, and this is where we first learned about SIP container gardening. We were intrigued, and Jesse did lots more internet research (he loves to research things) to learn more about how we could apply this ourselves (this is a pretty good site to learn more). You can purchase SIP containers read to go, but I wanted something that was a little more aesthetically pleasing than what is out in the market, and we already had two tall planters my mom had gifted to us (and I really like overcomplicating things). We tried this for the first time last year, and it worked out pretty well. We had more success with the cherry tomatoes than the bell peppers, but that could be for a variety of reasons.

Our planters worked out great to convert to a SIP. The extra height allows enough room in the base for the water reservoir. Dimensions will vary depending on the planter you use, but as a reference, here is what we were working with. Tulip planter (widens at the top): 20”tall, 14” diameter at the top, 9.5” diameter at the base. 2 gallon bucket: 9” tall, 9”diameter.


SUPPLIES 
Planter, bucket/container for the water reservoir, PVC pipe for the fill tube, plastic water bottle for the soil wick, plywood/wood/bucket lid for the platform, landscaping cloth (not mandatory), and a mason jar to fit over the fill tube opening.

1. Find an appropriate planter (my mom purchased ours from Piney Ridge in Johnston, Iowa).
2. Find a bucket/container (the water reservoir) that fits snugly into the bottom of the planter. It still needs to have a little extra space on the sides, so when the reservoir becomes full*, the extra w­ater will spill over the edges, and out the bottom of the planter. Our bucket is made of HDPE (high-density polyethylene) food grade plastic.
*If you can/want to drill holes into your planter, you can drill drainage holes near the top of the water reservoir, and this will allow the extra water to flow out through the openings.
3. The platform piece should fit on top of the bucket/container. We used untreated plywood*. The platform is the same diameter as the bucket. You will need to cut two holes, one the diameter of the water bottle you will use for the wick (placed in the middle), and a smaller hole that is the diameter of the fill tube (off to the side).
*We may try finding a bucket with a lid next year, and using the lid as the platform. This may be more efficient than what we currently have.
4. We purchased a large bottled water to use for the wick (the extra large size). Jesse cut the top off, and drilled several holes into the plastic. It wasn’t quite tall enough to touch the bottom (it should be slightly taller than the bucket), so he added a few pieces of leftover plywood to the bottom. Gradually fill plastic bottle with soil, watering the soil and compacting down the soil as you add more so it is very dense. 
5. Place wick in center hole, make sure top is flush with the platform.
6. Cut the bottom of the PVC pipe (fill tube) at an angle to ensure the water can flow into the bucket. Add fill tube through smaller hole in platform. 
7. Add landscaping fabric*. You won’t need much landscaping fabric, so we asked some friends who were homeowners, and one had lots of extra that he was happy to pass onto us. You can adjust the fabric as you add the soil. If you can, try to keep the fabric above the soil line.
*Not mandatory, but can prevent roots from getting into the water reservoir. We used landscaping fabric last year, and the bell pepper roots still made it around the landscaping fabric and started down the side of the fill tube. I don’t think this affected the peppers at all though.
8. Fill with soil.
9. Place plant into dirt. Place a cover over the fill tube when not in use. A mason jar works well. This does a couple things; it keeps mosquitoes from going into the tube and laying their eggs in the water, and also keeps other stuff from clogging up the tube.


Depending on how much rain you have, and how hot it is will effect how often you need to water. If the dirt is dry, I like to start by watering from the top, so the plant and top soil are wet. Than we fill up the reservoir by pouring water into the fill tube. We continue to fill it with water until we see water pool up in the tray on the bottom. Since we have a 2 gallon container, we also know roughly how much will fill it up (this also allows us to see how much water was soaked up within a period of time). A gallon milk jug works well for this part, since it also lets you measure and track how much you have put in.­­

We’ve figured out a water management system, but now need a pest control system. We made it about half way through last season before the squirrels found our tomatoes (they left the pepper and other plants alone). They have already found the plant this year, and started to eat the leaves of the tomato plant! It really pisses me off, and we are working on a system to keep them out of it. We are trying bird netting, but haven’t quite figured out the logistics yet. If you have any suggestions, let me know!
Succulents and JELL-O

Last week a friend had a mini Easter swap. Each person brought something they made for the other people participating in the swap. I thought of a great idea the month before, and than ran out of time. So, this was the backup plan. It was fairly easy to put together, and didn’t take too much time.


My mom works at a greenhouse part-time in the Spring, so she was able to pick up some succulents for me. I told her to get a variety, and didn’t realize she would be able to get 10 completely different styles – there are so many varieties of succulents out in the world! I knew I wanted something reclaimed to use as the pot, and I also wanted it to be cheap. I found a set of these adorable vintage JELL-O molds that were under $1 a piece – perfect! (I have an aunt who makes fancy JELL-O for holidays, so it reminded me a bit of Easter too!)


I used a dremel tool to drill tiny holes in the bottom, and spray painted them gold. I tried a couple other colors including a pink one that looked like strawberry jello (!) but the gold spray paint coated the easiest, dried the fastest, and is a neutral enough color that people could place it in their home. I bought some cacti potting soil, and replanted them in their fancy new/old pots.


I have to admit, I fell in love with the mini JELL-O molds, and felt guilty about drilling into them and painting them. I think I will now keep my eye out for more next time I’m at an antique shop!

Movie Foodie: 13 Going on 30

I had the first Movie Foodie of the year a few weekends ago. 13 Going on 30 seemed like an appropriate film for my 30th year. 13 Going on 30 is such a cute movie, Jennifer Garner is adorable in it and Mark Ruffalo plays the perfect guy you love to love.


I chose Razzles as the key food item, and wrapped them up as favors (along with some "wishing dust" sprinkled inside) for the guests. Other food items included a veggie tray and “pigs in a blanket” from the birthday party scene, and strawberry chocolate chip pancakes from Jenna’s visit to see her parents. Piña coladas were the drink (my first time making real ones, they are easy too! I couldn't find the cream of coconut at the grocery store, but found it at a liquor store) and guests could keep them “virgin”, or make them “not virgin”.


For décor, I bought some silver fringe and used the laser machine at work to cut out the quote “30, flirty & thriving”. Also, I made it pajama party themed, a perfect excuse to wear pjs while watching a movie!


There are a few ways I choose what movies are best for Movie Foodie night. First, it’s a girl’s night, so I don’t have to worry about pleasing the dudes. Romantic comedies are totally acceptable. Secondly, the movie can’t be too serious – which means nothing that will make me, or others cry. The ending of Big Fish makes me cry every time (I only watch this one by myself, I prefer to cry alone so I can really enjoy it). As much as I love Big Fish, it won’t be Movie Foodie night. Third (which should probably be the first) - does food play a role in the movie? I wouldn’t call any of the movies I have shown, “foodie” movies, but either the food is a part of the plot, or becomes a prop between characters. But, some movies are just fun to throw a party for. My next Movie Foodie in October is Beetlejuice. I have no idea what the menu will be, but I’m so excited to decorate for it!

May Day baskets

I love May Day. As a kid we would put May Day baskets at our friend’s doors in secret – they usually involved strawberry baskets and popcorn. I can’t remember why you weren’t supposed to get caught delivering the baskets, but it was a lot of fun.


I made six of these baskets 2 years ago, and they are still one of my favorite craft projects. I like to think of May Day as a celebration of spring and Earth Day, so I tried to keep everything recycled or usable. Flowers are an important component of the holiday, and in this case I used Celosia, because it is a bright and happy plant. The “pots” were parfait glasses I found at an antique shop (they were really cheap too, about a $1 a piece!). The plant picks where made by rolling out Sculpey (the kind you bake) and stamping letters in it using my William Sonoma, Message in a Cookie kit. The baskets where made from cereal boxes (really simple with a bottom and 4 sides, and held together with washi tape). The handles double as headbands. They are strips of fabric braided together, and sewn onto elastic. 


I still think May Day baskets should be delivered in secret. I got in extra early to work to deliver them to each person’s desks – it was so exciting! I felt like Santa delivering presents:)

Deco Rush - Japanese "tape"

A co-worker told me about this awesome product from Japan and I immediately had to purchase one for myself. It’s similar to white out tape, but it has cute little illustrations on it instead. While it’s called tape, it’s not really like tape. It sticks to the paper, almost invisibly, but it can’t adhere something together like tape would. Best for decorating notes, envelopes and mail – any paper product really! The only problem I’ve had so far is the tape occasionally breaking apart. Applying even pressure usually fixes the problem though.


I bought a set that includes the tool, and three cartridges. They are really easy to change out, so you can purchase several different illustrated tapes. This set has clouds, airplanes and zephyrs, and hot air balloons. I also bought a cartridge that has colorful sloths wearing party hats!

Large Fractal Radiance Quilt


I finished this quilt top back in September to test the large Fractal Radiance pattern. I would say the most time consuming part was choosing the fabrics. This was a last minute test, so I didn’t have time to purchase fabric and I didn’t really want to spend money on new fabric. It forced me to use what I had in my stash (a lot of green and yellow solids), which also led to a more unexpected color combination – at least for me. I had to piece a few of the triangles (you’ll notice it in the upper right red triangle) due to fabric that wasn’t quite big enough, but I think it actually worked for this particular quilt pattern. I also incorporated some small prints that almost read as solids – and I think it worked well!


Four months later I finally got around to quilting and finishing the quilt. I have been doing so much geometric/straight quilting, I really wanted to get away from that, so I just did an overall scallop pattern inspired by an old quilt passed down in Jesse’s family. Since the colors are more playful, I think having the contrast between the piecing and quilting works. I also added a normal binding, instead of the facing finish I used on the small fractal. I’m not quite sure where this quilt will end up, but I’m also not ready to give it away either. If anything, it should be a decent size for a lap quilt. Want to make one of your own? Purchase the pattern here!