Finally, the finished quilt!


I love the way this quilt turned out! It wasn't a difficult pattern or overly challenging, but anytime I actually finish a quilt, I feel good. Most people probably don't realize how expensive all the materials cost, and how much time really goes into making one. But, it's something that will last many, many years and will fill that person's life with warmth and love - at least that's what I like to think! Quilts are made to be used. They are the best kind of art - the functional kind.

Hand stitched binding


This is one of my favorite parts of quilting. I like to hand stitch the binding on, because it gives it a clean finished look. It takes longer, but I already put so much time into it, so why not do it right?
It's really relaxing (unless you are scrambling to get it done before a baby shower) because you can sit and watch a movie and go into auto pilot. I would recommend a thimble though! My fingers were not happy with me by the end.

The Quilting, continued...

I decided to go with free motion quilting on this quilt. I haven't done much of this, and it definitely takes some practice to feel really comfortable AND get good results. I have a Bernina sewing machine, and I have the #9 foot, which I used for this technique. It's different from other feet in that it doesn't sit on the fabric, and it also doesn't guide the fabric. You put the feed dogs down on your machine, and this allows you to have full control over moving the quilt around. This allows for more freedom, but also means that you have to have control over your movements! You control the speed, which means you control stitch length.


I didn't really have a plan when I started quilting. I was thinking swirls that would resemble a flower. As I was going, I started adding the scallop/petals. I love the way it turned out - and gave up on thinking it has to be perfect.


In many ways I felt this technique was much quicker than stitching in the ditch, or straight line stitching. It allows for more creative expression, and allows for the quilting to become a design as well that compliments the piecing.

The Quilting

I'm so glad to be able to have hardwood floors in my apartment. Not only do they have a lot of character, but they are the perfect setup for preparing to quilt. I use masking tape to tape the back of the quilt to the floor. This allows it to stay nice and flat and helps to eliminate bunches in the fabric.

I start in the middle on the long side, move to the other long edge, than start in the middle on the short ends. I slowly move my way out until it's all secure.


I lay down the batting, and than the quilt top, making sure each is smoothed out. Than I use safety pins to pin it all on place, holding all the layers together.


After it's all together, I un-tape the back layer, and it's ready to be quilted!

The making of a baby quilt...


The top photo is the setup I had while sewing this quilt. I have my sewing machine set up on my Hoosier cabinet, which provides a decent height for sewing projects. As you can see, I'm not very organized, but there's a system amongst the chaos.

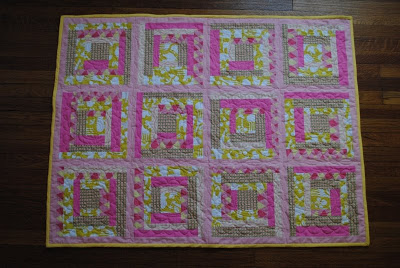
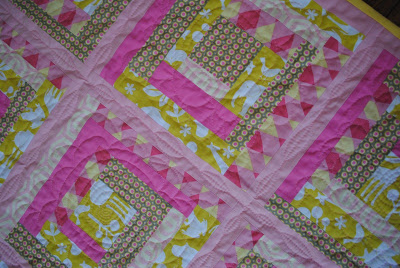
I decided on a variation of the Log Cabin Block. It was a fun quilt to work on, but it required lots of ironing between sewing. I came up with a setup that allowed me to never have to get out of my seat. Part laziness, part time management. I even kept some cereal nearby as a snack, and setup up my laptop near the cabinet to play movies as background noise/entertainment.

The key to ironing is actually pressing. Instead of moving the iron around constantly, you press for a few seconds, move a little and press some more. This allows the heat to actually set in. I also keep a spray bottle on hand, spraying the seam at the end and than pressing, which creates a very crisp, non-wrinkled seam.

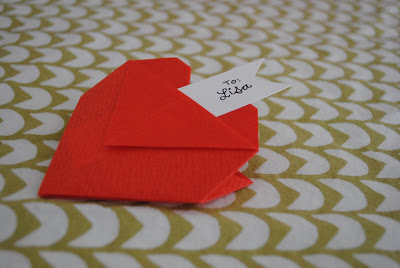
I decided on open seams for this quilt, since I didn't have to butt up any seams, and also thinking that it would reduce bulk. Lots of pressing is involved. Press the threads on the sewn seam, press the fabric open and than flip the piece over and press the seam open. This is where I spray the seam with water, to create an open seam that will lay flat. It will end up looking like the last photo.

Ashley & Brett


I've been busy, busy, busy working on a couple different projects for friends. Baby shower invites, a baby quilt, and wedding invites.

I've known Ashley for so long, I can't even remember when we first met. We grew up in the same neighborhood our entire childhood and our friendship survived through several different clubs and tree forts and the collection of many stink bombs (black walnuts still in their husks). How I miss those summers...

So, given our long friendship, and the fact that her and Brett are getting married 9 years after their first date (!) I couldn't resist helping them with their wedding invites.

I hand lettered their names, scanned it in at 600 dpi, cleaned it up in photoshop (I use a Wacom tablet), dragged the lettering into a 300 dpi file (to double the size) and than brought that file into Illustrator. I use LiveTrace, tracing options, 'Comic Art' preset, and than adjust the 'Corner Angle' to 60 and click the 'Ignore White' box. I usually have minor clean up to do after vectorizing, but the lettering turns out pretty clean.

2011 Valentines


I needed to make 7 handmade Valentines for the swap, and so I decided to make origami heart envelopes for all the people in my area (about 28 people) too. I mean really, what's 28 more Valentines?! I had some leftover Neenah Eames paper (which I don't think is being sold anymore) and cut it to a 3" square. It was an easy project to do while I watched tv shows or movies online. I added a little flag for the name and put some chocolates in the back envelope portion. I found the template here.

Valentine's Post Box

The inspiration: an Italian post box!


Use or modify this template for your own post box.

My friend at work is hosting a Valentine's swap this year. The mission was to create a Valentine themed box for another person. And I had the perfect inspiration - an Italian post box!

I started with a granola cereal box, approximately 6.25" x 8.5" and a slightly larger cereal box, approximately 7.625" x 10.125". The smaller box became the basic structure, and I used the larger box to cut out the front and the raised design elements. I turned the boxes inside out (gently pulling them apart at the side seam).

I made a sketch (with tracing paper overlaying a photo of the research) and than used that as a template to cut out the shapes. Some red spray paint and a handful of hearts later, and shazam - you have a Valentine's box!

After drawing all the line work (with a permanent pen - other ink won't stick to the paint) I hot glued all the pieces together (I'm impatient and wanted an instant glue bond, plus the thickness of the hot glue helps the pieces stand higher).

Hopefully she'll be able to use the post box throughout the year, and it was a great way to recycle a cereal box.

Abigail's Apron


I made this apron and oven mitt for my niece Abigail, for Christmas. Of course when she opened it, she barely would put it on for a photo, but I like to think she'll appreciate it one day! Hopefully before she can't fit in it anymore. Though, I was able to fit my hand in the oven mitt - so maybe she'll be using it 20 years from now!

I used the pattern posted above ($1 sale at JoAnn's!) with some minor tweaks. I was somewhat limited on the amount of fabric I had, so the top ruffles were eliminated. Lesson to learn, buy fabrics with intent! It's hard matching random 1/2 yards and fat quarters of fabric together.

I also lined the oven mitt, so all the seams weren't exposed. To add a finishing touch, I added the pink ribbon to both the apron and mitt. Now, if only I can get around to making myself a full sized apron!

The Hermit and Her Shell


I am officially starting the blog! I'm hoping to share crafting experiences and insights, and use this as a place to catalog the time consuming projects I get myself into. Plus, I really need another excuse NOT to exercise...